Thursday, December 23, 2010

Holiday washer pendant

Project #2 Washer pendant


3/8” washer 2 @ .23

1/4” washer 3@ .18 total cost: .97


Home Depot is the place to be.
High livin' is the life for me.
Tools spread out so far and wide.
Keep Wally World, just give me that Home Depot smile.

You guest it ladies, today project was bought at Home Depot! We are going to make 5 gorgeous pendants out of washers and you won't believe how easy and budget friendly they are to make.


Materials needed: 5 washers, various scrap paper, left over miniature letters, bling, ribbon, glossy accents, and some bails.


  1. Using glossy accent I adhered the paper to the washers. Set a side and let them dry for about 30 minutes to an hour. Then using your x-acto knife cut the centers out of the washers.


Now we are ready to embellish each one with left over stickers, bling, pearls, and anything else you have lying around. After you're done embellishing to your heart's desire coat the whole washer with a thick coat of glossy accents.


At this point I set mine aside to dry over night


The next day I added ribbon and chains turning ordinary hardware from Home Depot into fun holiday jewelry for five friends for 97 cents.

Tuesday, November 30, 2010

Christmas on a dollar

The holidays are upon us and the scramble is on for those gifts for friends and loved ones. I am always stunned by how fast my money goes around Christmas, even if I try and be thrifty. This started me thinking about how we all need those extra little gifts for teachers, neighbors, co-workers, hair dresser or a hostess gift.

So this year I have decided to take a different approach to gift giving and challenge myself to embellish and create small gifts out of dollar finds.

Andy is always teasing me that I have an entire scrap store in my craft room, so I plan on only using what I have on hand to embellish my budget friendly finds.


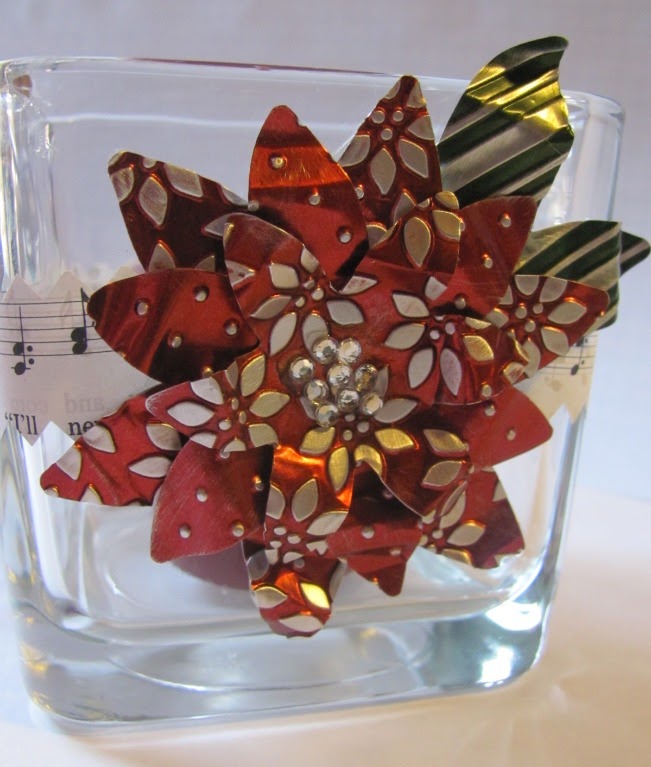
Project #1 The Christmas votive

Cost: $1


My first project is a 3 ½” x 3” glass votive I found at the Dollar Tree.

The Dollar Tree is one of my favorite places to browse, and I just can't resist asking the check out lady “hey, how much is this?”, every time I go in there. I love it when they roll their eyes at me and say “a dollar”. LOL!


I used Ten Second Studio metal to create my poinsettia, but paper will work just as well.

You will need the following materials: Votive, Ten Second Studio metal: barn red/poison ivy, three different Cuttlebug embossing folders, Basic Grey flower layer #6 die cut, 3mm bling, tacky tape, sheet music, a sanding block, and pinking shears or decorative scissors.


*After die cutting your metal, emboss it using a texture folder.


*Die cut your metal using the BG #6 flower die in your Cuttlebug or Bigshot. After die cutting your metal and embossing it, lightly sand the top of the metal with your sanding block.


*Cut music paper into 1” strips

My sheet of music was only 5 1/2” wide, so I had to glue two 1” strips together in order to get one long enough to fit around my votive.


*After you have created one long piece, you can then trim it with your pinking shears or decorative scissors. Wrap your music strip around the votive using glossy accents to adhere it to the glass.


*Tacky tape the back of your flower pieces. Peel your tacky tape off of the two smaller flowers and start layering them on top of each other. Remember to bend your petals and leaves to give it some added dimension. Adhere the Poinsettia to the votive and tweak.


*Glue your 3mm bling to the center of your flower using glossy accents. And now you have a unique little gift that was quick and only cost a dollar.

Last weeks test tube winners are: Laurie, NikiLynn, and Bonnie Belk! Ladies email me your addresses at Trishliciousandco@hotmail.com

Be sure to leave a comment so you can win some fabulous prizes!


Next project was found at home depot and cost .98!

We will be getting not one but five gifts out of it so check back this weekend for details.

Thursday, November 25, 2010

Give Thanks


Happy Thanksgiving!

Friday, November 12, 2010

Test tube Christmas ornaments


I was playing around with some test tubes trying to figure out something fun to do with them. I decided to fill them with goodies like shell buttons, pearls, and metal flowers. After embellishing them I thought it would be cool to turn them into Christmas ornaments.

Test tube Christmas ornaments 2


After soldering a jump ring on I was able to hang them on the tree. I think they add a fun and whimsical feeling to the tree. I will be giving away two of these great altered test tubes to some lucky person. So be sure to leave a comment for a chance to win one of these little beauties.

Sunday, August 15, 2010

Up coming classes

***The Little Blue House***

November 16, Beginning Soldering 10am-1pm
December 6, Holiday Soldering 10am-2pm & 6:30-9:30
December 8, Holiday Soldering 10am-2pm & 6:30-9:30
December 20, Holiday Soldering 6:30-9:30

We will be creating fun holiday projects this month!
If your interested in being a part of the class please contact the The Little blue house.

The Little Blue House
118 W. Olive St.
Keller, TX 76248
(817) 431-7930


***********************************************************************

The Crafty Scrapper

I will be at the Crafty Scrapper doing a fun holiday make n take on Saturday November 27.
It's a gorgeous cookie plate for Santa using Ten Second Metal.
If your interest in making one the cost is $5 so stop by and see me.

The Crafty Scrapper
308 South College Street
Waxahachie, Texas 75165
(972) 923-3151


Other Soldering dates at the Crafty Scrapper;

November 13, Fall 101 soldering 10:00 am
November 30, Holiday Necklace 10:30-1:30
December 3 & 4 Winter Wonderland Snow Globe 10:30- 5:00 (taught with Lisa Pace)
December 7, Holiday Ornaments 10:30-1:30
December 11, Holiday Necklace 10:30-1:00 and Ornaments 1:30-4:30

Home sweet home


Home sweet home
Originally uploaded by TrishaLouise
I think my creativity really comes out when I am in a pinch.
Last week I needed a quick gift for a friend who had just moved into a new home. So I created a little door hanging using my FAVORITE paper artsy stamps. I got these in England a few years ago but The Crafty Scrapper in Waxahachie, Texas has them now.